
Conclusion
Welcome back boys and girls. Get your crayons out and have as seat as we finally conclude this series. Long, but worth it.
In order to get to a working result, I’m just going to pretend that we created a custom object called “Book” (Book__c) for the display purpose. Given that this is the case, we can then assume that the implmentation of the Mass Delete Searcher from Part I – The T<MyCustomObject>MassDeleteSearcher would be as follows:
|
1 2 3 4 5 6 7 8 9 10 11 12 13 14 15 16 17 18 19 20 21 22 23 24 25 26 27 28 29 30 31 32 33 34 35 36 37 38 |
/* @ClassName: TBookMassDeleteSearcher @Author: Nethaneel Edwards @LastModifiedDate: 8/12/2013 @Purpose: The purpose of this class is to implement the mass delete searcher for Book for objects of type Book__c */ public with sharing class TBookMassDeleteSearcher implements IMassDeleteSearcher{ /* @Summary: Default constructor for this class. */ public TBookMassDeleteSearcher(){ } /* @Summary: Method combines the where query, limit and offset to get the paged records of the entity with the fields desired. @param pWhereQuery: The filter for the search results @param pLimit: The page size for the records retrieved @param pOffset: The page of records to retrieve @return List<TSearchResultItem>: The list of records retrieved and formated into a TSearchResultItem */ public List<TSearchResultItem> GetSearchRecords(String pWhereQuery, Integer pLimit, Integer pOffset){ List<TSearchResultItem> result = new List<TSearchResultItem>(); String SampleQuery = String.format('SELECT Id,Name, CreatedBy.Name, CreatedDate FROM Book__c {0} LIMIT :pLimit offset:pOffset',new string[] { (!TStringUtils.IsNullOrEmpty(pWhereQuery)? ' WHERE '+ pWhereQuery: '') }); List<sObject> pSearchRecords = Database.query(SampleQuery); for(sObject sr: pSearchRecords){ TSearchResultItem pSRI = new TSearchResultItem(sr.Id, String.format('{0} - {2}', new string[] {((Book__c)sr).Name, 'Book','Book__c',sr); pSRI.ExtendedProperties.put('IndexedBy',(( Book__c)sr).Name); pSRI.ExtendedProperties.put('CreatedBy.Name',(( Book__c)sr).CreatedBy.Name); pSRI.ExtendedProperties.put('CreatedDate',string.valueOf(((Book__c)sr).CreatedDate)); result.add(pSRI); } return result; } } |
Now that we’ve gotten that out the way lets set our expectations on the table. My expectation is that the result of our code looks like that of salesforce’s mass delete page:
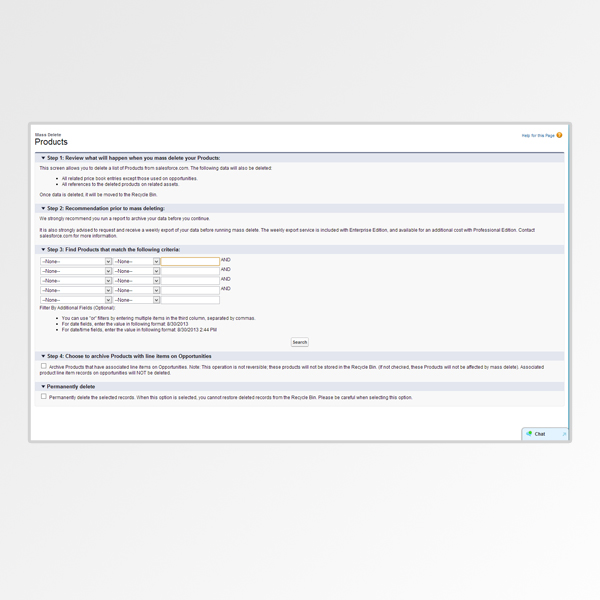
Salesforce.com example of a Mass Delete Searcher for Products
Now let’s begin.
The Point
The first thing we want to do is create a custom apex page for the Book. So type in your address bar (replace c.cs00.visual.force.com with your organization url):
https://c.cs00.visual.force.com/apex/MassDeleteBookPageIn our page, we will want to set the controller to our MassDeleteCustomEntityController which we made in Part III:
<apex:page tabStyle="Book__c" controller="MassDeleteCustomEntityController">Next, I set up my section header to reference the EntityName of my DataContext for Display purposes and add the room for the page messages:
|
1 2 3 4 5 |
<apex:sectionHeader title="Mass Delete" subtitle="{!DataContext.EntityName}"/> <apex:outputPanel id="opPageMessages"> <apex:pageMessages > </apex:pageMessages> </apex:outputPanel> |
The next section doesn’t really reference the controller except for a single search command button. It’s just for the template that mimics that of salesforce. Take note of the three sections which I ommitted – The INPUT, OUTPUT, and CONFIRMATION:
|
1 2 3 4 5 6 7 8 9 10 11 12 13 14 15 16 17 18 19 20 21 22 23 24 25 26 27 28 29 30 31 32 33 34 35 36 37 38 39 40 41 42 43 44 45 46 47 48 49 50 51 52 |
<apex:form > <apex:pageBlock > <apex:pageBlockSection title="Step 1: Review what will happen when you mass delete your Books:"> <apex:pageBlockSectionItem > <apex:outputText >This screen allows you to delete a list of Books from salesforce.com. The following data will also be deleted:<br /></apex:outputText> </apex:pageBlockSectionItem> <ul style="list-style-type:circle;}"> <li>All Activities associated with the Books</li> <li>All Notes associated with the Books</li> <li>All Activities associated with the Bookmarks</li> </ul> </apex:pageBlockSection> <apex:pageBlockSection title="Step 2: Recommendation prior to mass deleting:"> <apex:pageBlockSectionItem > <apex:outputText >We strongly recommend you run a report to archive your data before you continue.</apex:outputText> </apex:pageBlockSectionItem> </apex:pageBlockSection> <apex:pageBlockSection title="Step 3: Find Books that match the following criteria:"> <apex:pageBlockSectionItem > <apex:panelGrid columns="1"> <apex:panelGrid columns="3" border="0" cellspacing="0" cellpadding="0"> <!-- Input data will go here --> </apex:panelGrid> <apex:outputText >Filter By Additional Fields (Optional): <ul style="list-style-type:circle;}"> <li>You can use "or" filters by entering multiple items in the third column. separated by commas.</li> <li>For date fields, enter the value in following format: 8/7/2013</li> <li>For date/time fields, enter the value in the following format: 8/7/2013 12:45 PM</li> </ul> </apex:outputText> <apex:commandButton value="Search" action="{!Search}" reRender="opPageMessages,opSearchResults,opDeletePanel" /> </apex:panelGrid> </apex:pageBlockSectionItem> </apex:pageBlockSection> <apex:pageBlockSection title="Step 4: Review"> <apex:pageBlockSectionItem > <apex:outputpanel id="opSearchResults"> <apex:panelGrid columns="1" > <!-- Output Data goes here --> </apex:panelGrid> </apex:outputpanel> </apex:pageBlockSectionItem> </apex:pageBlockSection> <apex:pageBlockSection title="Step 5: Delete"> <apex:pageBlockSectionItem > <apex:outputPanel id="opDeletePanel"> <!-- Confirmation for delete goes here --> </apex:outputPanel> </apex:pageBlockSectionItem> </apex:pageBlockSection> </apex:pageBlock> </apex:form> |
The input goes a little like this – From the display we looked at in salesforce, we can conclude that it’s a 3 column display with the input elements repeated in each. Those elements are the FieldOptions, ComparisonOptions and TargetValues respectively:
|
1 2 3 4 5 6 7 8 9 10 11 12 13 14 15 16 17 18 19 20 21 22 |
<apex:repeat value="{!DataContext.FieldOptions}" var="fo"> <apex:panelGrid columns="2" > <apex:outputText value="Field: " /> <apex:selectList size="1" value="{!fo.SelectedOption}"> <apex:selectOptions value="{!fo.Options}" /> </apex:selectList> </apex:panelGrid> </apex:repeat> <apex:repeat value="{!DataContext.ComparisonOptions}" var="co"> <apex:panelGrid columns="2" > <apex:outputText value="Comparison: " /> <apex:selectList size="1" value="{!co.SelectedOption}" > <apex:selectOptions value="{!co.Options}" /> </apex:selectList> </apex:panelGrid> </apex:repeat> <apex:repeat value="{!DataContext.TargetValues}" var="tv"> <apex:panelGrid columns="3" > <apex:outputText value="Value: " /> <apex:inputText value="{!tv.DBConst}" /><apex:outputLabel value="AND" /> </apex:panelGrid> </apex:repeat> |
Now for the output, we need a generic way to render a table of results with paging considered. Take note, that because of the generic nature of our controller, that there is no complex display logic involved. Only simple bindings – very much like Silverlight 😉 :
|
1 2 3 4 5 6 7 8 9 10 11 12 13 14 15 16 17 18 19 20 21 22 23 24 25 26 27 28 29 30 31 32 33 34 35 36 37 38 39 40 41 |
<apex:outputText >SampleQuery: {!SampleQuery}</apex:outputText> <apex:outputText rendered="{!SearchRecords.size>0}" ><apex:inputCheckbox value="{!DeleteAllRecordsFound}" /> Delete all records found. Please be careful when selecting this option.</apex:outputText> <!-- Paging Information --> <apex:outputPanel id="pbPagingBarTop"> <apex:panelGroup > <apex:commandButton title="First" value="<<" action="{!Paging.First}" reRender="opSearchResults" disabled="{!Paging.AllowFirst==False}" /> <apex:commandButton title="Previous" value=" < " action="{!Paging.Previous}" reRender="opSearchResults" disabled="{!Paging.AllowPrevious==False}" /> <apex:commandButton title="Next" value=" > " action="{!Paging.Next}" reRender="opSearchResults" disabled="{!Paging.AllowNext==False}"/> <apex:commandButton title="Last" value=">>" action="{!Paging.Last}" reRender="opSearchResults" disabled="{!Paging.AllowLast==False}" /> </apex:panelGroup> <apex:panelgroup > Page(s) {!Paging.PageNumber} of <apex:outputText value="{!Paging.TotalPages}" rendered="{!Paging.TotalRecords!=Paging.RecordCountLimit}" /> <apex:outputText value="{!Paging.TotalPages}+" rendered="{!Paging.TotalRecords==Paging.RecordCountLimit}" /> Total Records: <apex:outputText value="{!Paging.TotalRecords}" rendered="{!Paging.TotalRecords!=Paging.RecordCountLimit}" /> <apex:outputText value="{!Paging.TotalRecords}+" rendered="{!Paging.TotalRecords==Paging.RecordCountLimit}" /> </apex:panelgroup> </apex:outputPanel> <!-- Table information --> <apex:pageBlockTable value="{!SearchRecords}" var="sr"> <apex:column headerValue="Delete Selected Records" ><apex:inputCheckbox value="{!sr.Selected}" rendered="{!DeleteAllRecordsFound==False}"/>{!sr.ExtendedProperties['IndexedBy']}</apex:column> <apex:column value="{!sr.Name}" headerValue="Name"></apex:column> <apex:column headerValue="Created By" value="{!sr.ExtendedProperties['CreatedBy.Name']}" /> <apex:column headerValue="Created On" value="{!sr.ExtendedProperties['CreatedDate']}" /> </apex:pageBlockTable> <!-- Paging Information --> <apex:outputPanel id="pbPagingBarBottom"> <apex:panelGroup > <apex:commandButton title="First" value="<<" action="{!Paging.First}" reRender="opSearchResults" disabled="{!Paging.AllowFirst==False}" /> <apex:commandButton title="Previous" value=" < " action="{!Paging.Previous}" reRender="opSearchResults" disabled="{!Paging.AllowPrevious==False}" /> <apex:commandButton title="Next" value=" > " action="{!Paging.Next}" reRender="opSearchResults" disabled="{!Paging.AllowNext==False}"/> <apex:commandButton title="Last" value=">>" action="{!Paging.Last}" reRender="opSearchResults" disabled="{!Paging.AllowLast==False}" /> </apex:panelGroup> <apex:panelgroup > Page(s) {!Paging.PageNumber} of <apex:outputText value="{!Paging.TotalPages}" rendered="{!Paging.TotalRecords!=Paging.RecordCountLimit}" /> <apex:outputText value="{!Paging.TotalPages}+" rendered="{!Paging.TotalRecords==Paging.RecordCountLimit}" /> Total Records: <apex:outputText value="{!Paging.TotalRecords}" rendered="{!Paging.TotalRecords!=Paging.RecordCountLimit}" /> <apex:outputText value="{!Paging.TotalRecords}+" rendered="{!Paging.TotalRecords==Paging.RecordCountLimit}" /> </apex:panelgroup> </apex:outputPanel> |
It is at this point that we confirm with the user if they are sure they want to do this. First of all, I could’ve gone with the basic javascript confirm dialog….tempting, but no. Why? Because I said so and this is my story:
|
1 2 3 4 5 6 7 8 9 10 |
<apex:panelGroup rendered="{!ViewModelState['CONFIRM_DELETE']==false && SearchRecords.size>0}"> <apex:commandButton value="Delete" action="{!ShowDeleteConfirm}" rerender="opDeletePanel"/> </apex:panelGroup> <apex:panelGroup rendered="{!ViewModelState['CONFIRM_DELETE']==true && SearchRecords.size>0}"> <apex:outputText >Are you sure you want to do this?</apex:outputText> <apex:panelGrid columns="2"> <apex:commandButton value="Yes" action="{!DeleteRecords}"/> <apex:commandButton value="No" action="{!HideDeleteConfirm}" rerender="opDeletePanel"/> </apex:panelGrid> </apex:panelGroup> |
If you noticed , I had no need to custom javascript here. All I did was take advantage of that little ViewModelState property of ours and just toggled the rendering of the actual delete versus the confirmation panel. Popups annoy me, that’s the only reason I did it this way.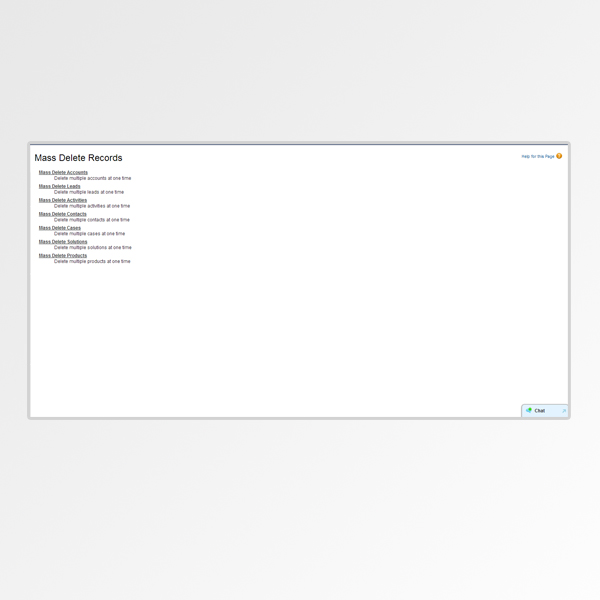
There is one small detail we have to take care of. If you remember, in the controller, we grab a few parameters from the page during initialization. Now, unless your user plans on typing them in, we of course need a parent page to lead us into this one. That page is a lot simpler and looks like the image on the right.
To get that, all we need is a generic lead in page first. So type in your url (of course, with your organization url):
https://c.cs00.visual.force.com/apex/MassDeleteCustomRecordsPageFrom here, the main code for one of those links should look like this:
|
1 |
<apex:outputText > <apex:outputLink value="{!$Page.MassDeleteBookPage}"><b>Mass Delete Books</b> <apex:param name="et" value="Book__c"/> <apex:param name="mdt" value="TBookMassDeleteSearcher" /> </apex:outputLink> <apex:outputText ><div style="text-indent:50px">Delete multiple books at one time.</div></apex:outputText> </apex:outputText><br /> |
Now you get to see how it all connects. I pass the Entity Type (et) as Book__c and the Mass Delete Type (mdt) as TBookMassDeleteSearcher. Don’t forget your section header and page messages in this page.
And there you have it folks! You should be able to lead in from this final page into the custom page you made, execute a search and a mass delete in bulks of 200. That’s the best I could do to help you. I’m sure they’re many ways to do what I showed here, but in the end, I’m pretty certain that even if the end results are the same, the techniques vary. Feel free to use them. Stay thirsty my friends.